• Skip to primary navigation
  • Skip to main content
  • Skip to primary sidebar
  • Skip to footer

Marge Perry's A Sweet and Savory Life

  • Recipes
  • Articles
  • Calendar
  • About
  • Contact

Pizza Bites

February 6, 2016 By Marge Perry Leave a Comment

Pizza Bites

This is how the cool kids do pizza. They don’t microwave frozen stuff or throw tomato sauce and shredded cheddar on English muffins– but they’re also WAAAY too busy to spend hours making fussy little bites that may be mindlessly devoured or dropped on the rug at the first shout of “Touchdown!”

The cool kids do is get all those real flavors on bite-size pizzas by putting good quality topping ingredients on prepared pizza dough. You can buy the dough at a local pizzeria. (Seriously, just walk in and ask to buy a pound of dough. They’re usually happy to sell it to you for a couple of dollars).

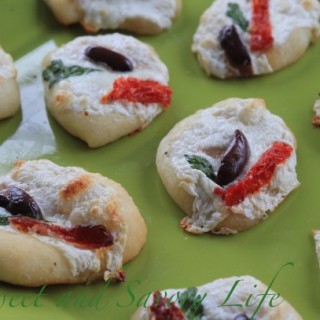
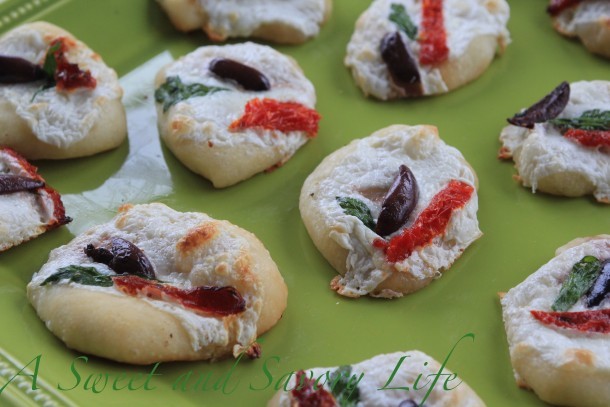
Most grocery stores also sell fresh refrigerated pizza dough– usually in the dairy section, for some reason. All you do is cut the dough in little pieces, flatten the pieces with the palm of your hand, and add a slice of fresh mozzarella and slivers of your favorite pizza toppings. I put a piece of calamata olive on mine, but you could also use a matchstick or two of pepperoni– whatever else rings your pizza bell.

Want more great, simple Super Bowl recipes?

Grilled Wings with Raspberry Sriracha Glaze

Peruvian Chicken Wings

Smashed Potatoes

Bacon Lollipops

Hummus

Bacon Popcorn

Print Recipe
Pizza Bites
Servings 32
  • 1 pound prepared pizza dough
  • 2 tablespoons olive oil
  • 8 ounces fresh mozzarella, cut in thin slices
  • 8 pitted, calamata olives, each quartered
  • 8 sun dried tomatoes, each sliced
  • 2 tablespoons grated parmesan
  • 2 tablespoons parsley and/or basil, coarsely chopped
Servings 32
  • 1 pound prepared pizza dough
  • 2 tablespoons olive oil
  • 8 ounces fresh mozzarella, cut in thin slices
  • 8 pitted, calamata olives, each quartered
  • 8 sun dried tomatoes, each sliced
  • 2 tablespoons grated parmesan
  • 2 tablespoons parsley and/or basil, coarsely chopped
  1. Preheat the oven to 450F. Coat a baking sheet pan with cooking spray.
  2. Cut the dough in 32 pieces and, working on a lightly floured board, press each piece to 1/3- inch thickness. Brush both sides lightly with the olive oil. Top with a slice of mozzarella followed by the olives and sun dried tomato. Sprinkle with the parmesan.
  3. Bake until the cheese is melted and the dough crisp– it will sound hollow when you tap it– about 12 minutes. Sprinkle with the parsley and/or basil and cool slightly before serving.
Nutrition per serving:
68 calories 2g protein 7g carbohydrates 0g fiber 3g fat 1g saturated fat 58mg sodium

Filed Under: Appetizers, Hors d'oeuvres and First Courses, Fast and Easy, Great for Gatherings, Recipes

Grilled or Roasted Spice-Rubbed Chicken Thighs: My Go-To Easy Dinner

July 7, 2011 By Marge Perry 66 Comments


I am handing you the keys to the Queendom. Spice-rubbed chicken thighs is the dish for all those times this summer you’re having friends over for a barbecue– and all the times year-round you need a meal you can get on the table with about 5 minutes of prep.

This is the chicken dish that everyone loves. Perhaps it is a slight exaggeration to say “everyone loves it”, because I am fairly certain vegans and vegetarians wouldn’t, and maybe one or two chicken lovers. No, I take that last part back: I have never met a chicken eater who doesn’t like these. That’s actually saying a lot, considering the number of people for whom and with whom I have made this chicken, both at home and in my classes at ICE.

Wow, that sounded like a sell job. Really, if you don’t want to try this particular recipe, that’s your business and I don’t want to be a recipe-pusher. But no matter what, this post should make it easy for you to roast and grill chicken thighs to perfection. Even if you don’t use this knock-your-socks-off, killer-good spice rub…

Before I get to the actual recipe, here’s my run-down on what you need to know to cook moist, tender and safe chicken thighs. (If after reading this you still have a question, write it in the comment form at the bottom of the post)

  • Thighs stay moist even when they’re a little over-cooked. This makes them stress-free to serve to company, because you can make them ahead and re-heat. Also, if you have a glass of wine while you’re cooking and get involved in a conversation with a friend, and then realize oh-my-god-the-chicken! you might still be okay. The same cannot be said of chicken breasts, fish, steaks, or burgers. (Disclaimer: if the conversation goes on for, say, 30 minutes, you may need to make alternate plans for dinner).
  • Thighs come with their own built-in handle, making them ideal for walk-around gatherings. The single bone that runs down the center sticks out a bit at either end, which makes thighs easy to pick up and eat without utensils.

  • Figure on two thighs per person, or three thighs for big eaters. But they vary in size, so use your judgement.
  • The raw, on the bone weight is about double the cooked yield. So buy 2 pounds of bone-in thighs to yield 1 pound of cooked meat.
  • Make them prettier. Thighs come out of the package looking like a cartoon splat. Or a Rorschach test. You need to pretty them up by pulling the skin evenly over the meat and folding the sides under.

messy splat-shaped thighs

neat prettied-up thighs

  • You cut 40-50 calories and 1-2 grams of saturated fat per thigh by removing the skin. Yup, but you also lose the golden, crisp skin. It’s a choice. (I go both ways, depending on how dedicated I am to dieting at the time.)
  • Don’t freak at the sight of pink. Thighs can be cooked to a safe internal temperature and still be pink (or even have a red bloody-looking spot) near the bone. That has to do with blood vessels and protein structure, not “rawness”. Use a thermometer and cook thighs to 170-175F. The thermometer should be parallel to but not touching the bone and the tip should be in the thickest part of the meat.

Thermometer inserted parallel to the bone

Okay, go cook.

Print Recipe
Spice-Rubbed Chicken Thighs
Servings 6
  • 2 tablespoons brown sugar
  • 2 teaspoons ground cumin
  • 1 teaspoon salt
  • 1 teaspoon garlic powder
  • 1 teaspoon ground ginger
  • 1 teaspoon cinnamon
  • 1/4 teaspoon cayenne
  • 1/4 teaspoon black pepper
  • 3-3.5 pounds chicken thighs (bone-in), about 12 thighs
Servings 6
  • 2 tablespoons brown sugar
  • 2 teaspoons ground cumin
  • 1 teaspoon salt
  • 1 teaspoon garlic powder
  • 1 teaspoon ground ginger
  • 1 teaspoon cinnamon
  • 1/4 teaspoon cayenne
  • 1/4 teaspoon black pepper
  • 3-3.5 pounds chicken thighs (bone-in), about 12 thighs
  1. If you are grilling, coat the grill rack with cooking spray and heat the grill for direct heat cooking. If you are roasting, preheat the oven to 425F and coat a large baking sheet pan with cooking spray.
  2. Combine the sugar, cumin, salt, garlic powder, ginger, cinnamon, cayenne and black pepper in a bowl, working the mixture with your fingertips to get rid of any lumps.
  3. Shape and trim the thighs. Pat the mixture over the entire surface of the thighs.
  4. To roast: place in the oven, skin side up, and cook until the largest thigh reaches an internal temperature of 170-175F, about 30-35 minutes depending on the size of the thighs. To grill: place on the grill skin side facing down and cook 15 minutes. Turn and cook until the largest thigh reaches an internal temperature of 170-175, about another 15 minutes.
Nutrition per serving:
322 calories 19g fat 5g saturated fat

Filed Under: Fast and Easy, Great for Gatherings, How-To, Poultry: Chicken, Cornish Game Hen, Turkey and Duck, Recipes

How to Cook Tender, Juicy (not dry!) Chicken Breasts

April 29, 2011 By Marge Perry 190 Comments

From left to right: Johnny, my son Zak, and Hope

My son is getting his first apartment this summer, and I didn’t want him to be hospitalized for food poisoning. Or die from malnutrition. Apparently, he and his roommates feel the same way, so he invited them over for a cooking lesson.

It only took a couple of hours for the three 20-year olds to learn to cook chicken, roast potatoes, sauté zucchini and sear salmon to golden-crusted perfection.

And along the way, I realized how learning a few key skills can have an enormous effect on the outcome of your cooking.

  1. To make tender, juicy, and safe chicken, you need to take its temperature. Otherwise, your chicken is going to chew like sawdust or make you sick.
  2. Learn how to sear, and you master the art of getting hundreds of easy dinners on the table in less than 30 minutes.
  3. Know how to roast and sauté vegetables so you can cook them stovetop or in the oven, depending on which is more convenient.

The first kitchen basic, which applies to cooks young and old, poor or wealthy, novice or accomplished, is:

How to Cook Tender, Juicy, Safe Chicken Breasts

Here’s the deal. As a nation, we’re eating an average of about 84 pounds of chicken a year. So unless you’re eating every meal out or don’t care if your next bite of chicken bears more resemblance to an old towel than a pleasurable and nourishing food, it’s worth learning the one-minute solution that guarantees your chicken will be moist, tender and safe.

Humor me while I tout the virtues of the boneless, skinless chicken breast for just one short paragraph. A simple boneless chicken breast is healthful (low in calories and fat), convenient (cooks in less than 10 minutes) and when prepared properly, appeals to a wide range of palates and eating styles. Dieting? Have a chicken breast. Picky eater? You’ll love the neutral flavor. Don’t want to eat as much red meat? Chicken is your IT food. But only if it’s cooked right.

Chicken breasts can go from being moist and succulent to overcooked—meaning dry and flavorless– in a window of less than 5 minutes. But you also can’t err on the side of not cooking chicken long enough: undercooked chicken can make you seriously ill.

Here is the life-changing*, incredibly simple solution: take your chicken’s temperature. You can’t do this by holding your palm to its brow: you need a thermometer. Specifically, you need an instant-read meat thermometer, like this:

The ESSENTIAL instant read meat thermometer

You can buy one of these at most house wares stores, like Bed, Bath and Beyond, as well as at many supermarkets and on Amazon . I like Taylor and Oxo brands, both analog or digital. These are not the probes you leave in a roast while it cooks, nor the thermometers with timers attached, nor something that withstands gale force rains. You just need a simple instant read meat thermometer that costs $5-15.

Okay, back to the chicken breast. It must be cooked to 160 degrees Fahrenheit. In order to ensure that it is cooked evenly, it has to be an even thickness. Otherwise, by the time the thickest part is cooked to a safe 160F, the thinnest part will be like a hockey puck. To make it even, you need to pound it. The good news about pounding chicken is that it is an ideal way to relieve stress. The better news is that it is fast and easy and doesn’t make a big mess. You can pound 2 pounds of boneless breasts to even thickness in about 5 minutes.

First, tear off a 2-foot long piece of plastic wrap and lay about 1 foot on your cutting board. Place a chicken breast, smooth side up in the center of that one foot area of wrap on your board.

This is the smooth side of the chicken breast…

This is the not-smooth, or rough side of the chicken, which you do not want to be face up:

Rough underside of the chicken, which should face down when you pound

Now fold the rest of the plastic wrap over the breast so the chicken is centered on the wrap and not near the edges or the fold. Use the smooth side of your meat pounder (aka mallet), not the side that looks like it has dinosaur scales. (That is for meat tenderizing, which most home cooks don’t do anymore. I think of those as dinosaur scales because they exist for a nearly extinct task).

This is the smooth side of the meat pounder:

Smooth surface of the pounder

This is the dinosaur, or rough side, which you do not want to use

Dinosaur side, which home cooks rarely use

Give the chicken a whack right in the center, even if the center isn’t the thickest part. You are not pounding the breast into submission, as if to say “You will be thin!” When you pound it, the meat spreads out to the sides, which is why you start in the center and work your way out. It sounds more complicated than it is. This process truly only takes a minute or two.

When it is fully pounded, the chicken breast looks like this:

Nicely pounded to about 1/4-inch thickness

Now it’s time to cook. Season the chicken on both sides. For every one pound, use 1/2 teaspoon salt and 1/8 teaspoon black pepper. You can always add more later.

Heat 1 tablespoon of olive oil in a 12-inch nonstick skillet over medium high. (You don’t need more oil than that, but I can almost guarantee you are using more. Try measuring it: you’ll save calories and money).

Add the chicken breasts, but make sure you don’t crowd them. (If they are too close together, they will steam instead of sear, which means they won’t have that nice golden crust). You can usually fit about one pound of chicken breasts in a 12-inch skillet. In this case, I am cooking enough chicken for two people, about 8 ounces total.

Cook until they are nicely golden on the underside. Not like this:

Barely golden and not ready to turn

But like this:

THis is what the underside should look like when the chicken is ready to be turned over

It will take about 5 minutes for the underside to have this beautiful golden crust– but go by looks, not time. once you turn the breasts over, you will again cook them until they are golden… but now you will know they are ready when they hit 160 degrees.

When you use an instant-read meat thermometer, the wand must be inserted at least one inch into the chicken, and the tip should be at the thickest or most center part of the breast. You can’t stick it in from the top– the breast is only about 1/4-inch thick. You need to insert the thermometer horizontally, like this:

Insert the wand of the thermometer horizontally

And remember, always, a chicken breast must be cooked to 160 degrees.

Cooked to perfection!

This simple, perfectly cooked chicken breast is juicy enough to make into a sandwich. It doesn’t even need sauce!

Enjoy!

*Okay, maybe I take food a little too seriously. But if a great meal is not life-changing for you, I hope it is at least mood-altering. And if so, shall we now think of well-prepared fare as a safe and healthy mood-altering substance?

You can serve the chicken as is, or perhaps make Chicken in Lemon Butter Sauce.

Other posts that may interest you:

How to cook chicken thighs, with step-by-step photos: Grilled or Roasted Chicken Thighs: My Go-To Easy Dinner

How to Buy, Cook and Eat Artichokes

Fast, Cheap and Easy: How to Cook Mussels

Print Recipe
Basic Golden Seared Chicken Breast
Servings 4
Dredging the chicken lightly in flour gives it a more even, slightly crunchy golden crust, but is not necessary. To avoid gluten, either simply omit the flour or replace it with rice flour.
  • 1 pound boneless, skinless chicken breasts, cut in 4 even pieces
  • 1/2 teaspoon salt
  • 1/8 teaspoon black pepper
  • 3 tablespoons flour, all-purpose or whole wheat (optional)
  • 1 tablespoon canola or olive oil
  1. Lay a piece of plastic wrap roughly twice as long as your cutting board over your board, with half laying to one side. Place a chicken breast half, smooth side facing up, in the center of the board and fold the plastic wrap over it. Using the smooth side of the meat pounder, start in the middle of the chicken and pound in an outward direction until it is an even 1/4-inch thickness. Repeat with the remaining chicken.
  2. If you are using flour, combine it on a plate with the salt and pepper; dredge the pounded chicken in the flour, coating it thoroughly and shaking off the excess. If you are not using the flour, season the chicken evenly on both sides with the salt and pepper.
  3. Heat the oil in a large nonstick skillet over medium high heat. Add the chicken, allowing room between the pieces. Cook until the chicken is deeply golden, about 5 minutes; turn and cook until it cooked to an internal temperature of 160 degrees and is again deeply golden on the underside. Remove from pan. (Keep warm by draping loosely, or by placing, covered in foil, in a 200F oven.)

Filed Under: Fast and Easy, How-To, Poultry: Chicken, Cornish Game Hen, Turkey and Duck, Recipes, Sandwiches

  • « Go to Previous Page
  • Page 1
  • Interim pages omitted …
  • Page 3
  • Page 4
  • Page 5

Primary Sidebar

I make my living writing, teaching and speaking about food and travel. In the name of work, I (have to!) eat a lot, meet interesting people (many of whom, like me, are passionate about their work) and travel near and far to see where and how food is made, grown or raised. I am saved from a life of extreme obesity by the fact that I truly love to exercise, but I am always one forkful away from not being able to button my jeans. Mine is a sweet and savory life.

I share it with my husband and co-author, David Bonom. Check out our new book, Hero Dinners: Complete One-Pan Meals That Save the Day

To learn more about me, click here →

Subscribe

sign-up here for email updates!

  • Want to see a cool trick for poaching eggs? Check out this video we did for Anolon. The trick comes at :22!

  • Craftsy Blogger Awards - Winner Best Tutorials Badge

    Popular Posts

    How to Cook Tender, Juicy (not dry!) Chicken Breasts

    Grilled or Roasted Spice-Rubbed Chicken Thighs: My Go-To Easy Dinner

    Strawberry Frosted Cupcakes

    Disclosure statement

    Do you have Chicken Anxiety??

    Become a Chicken Master! Make moist, tender, juicy, safe chicken each and every time. My online Craftsy video class, All About Chicken will show you how. Click here to learn more-- and get a special reader discount of half price.

    Footer

    Hero Dinners: Complete One-Pan Meals That Save the Day, our latest cookbook, is available wherever books are sold (including on Amazon).

    Want to see more of my work? Click on "Articles" at the top of the page for links to our recipes, articles and videos in magazines, websites, and social media.

    Feel free to connect/follow via any of the social media buttons below or drop me a line here through my contact page. Read More…

    More From the Blog

    Subscribe

    sign-up here for email updates!

    Copyright © 2026 asweetandsavorylife