Roasting a turkey is easy and uncomplicated. But because so many people swear by so many methods as “the one and only method to ensure absolute turkey perfection”, our heads get spun around. Brine! Fry! Tent! High temperature/low temperature/reduce temperature halfway through cooking… the list goes on and on.
Let’s keep it simple. If you want to brine and you like the result, go for it. I think it is a big complicated mess that results in moist but mealy meat. But lots of people disagree, and what matters is if you like the result.
Then there’s frying. A few years ago I went to the Greystone campus of Culinary Institute of America in Napa Valley and we fried turkeys in peanut oil. The good news is I learned all about the health and culinary benefits of peanut oil. But I also that learned deep-frying turkey is a big, complicated– and dangerous– mess that results in meat that pretty much tastes like it was roasted. So where does sliding that big slippery bird into a vat of hot oil get you?
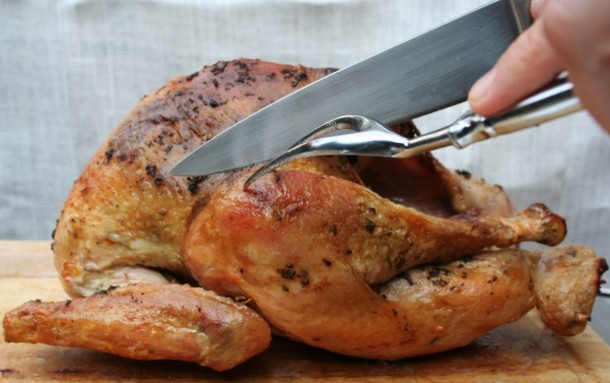
Let’s agree, then, to roast. It’s a simple matter really: season the exterior, stick it in a roasting pan and cook until it hits 170 degrees. Take it out and let it rest for nearly half an hour, then slice and serve. Here are just a few questions that might occur to you along the way.
To Rack or Not to Rack? Whether you roast the turkey on a rack or directly in the pan depends on the height of your roasting pan. High sides (three or more inches) may inhibit the lower parts of the bird from browning well; in that case a rack lifts her up and allows heat to get directly to all but her underside.
If you do use a rack, coat it with cooking spray. Yes, partly because racks are such a nuisance to wash– but more importantly, you don’t want the precious skin to stick and potentially tear when you transfer the turkey to the carving board.
To Stuff or Not to Stuff? Some folks swear by the flavor of the stuffing when cooked in the bird. To get the same flavor, when you take the turkey out of the oven drizzle some of those great pan juices over the stuffing in a baking dish. Heat the stuffing while the turkey rests and gets carved, and by then the juices have baked into the stuffing. Baking stuffing separately is safer, allows the bird to cook faster, and makes controlling the consistency of your stuffing a whole lot easier. (If it seems dry, you can add broth or butter, and if it is too wet, uncover and bake until it dries out. You certainly can’t do either if the stuffing is in the bird.)
You need to tie the turkey either way. Just run a piece of twine around the narrowest part of the drumstick– the part that looks like “ankles” in a figure 8 pattern and knot it. Then take the pointy part of the wings and tuck them down so they don’t stick up and get burned. (This also prevents them from flopping down as the bird roasts. It just doesn’t look as nice when the wings are splayed out to the side).
To Baste or Not To Baste? I think we turkey-cookers need to baste. After all, we think about and smell the turkey for those many hours it cooks, and we want to feel involved. The truth is, frequent basting doesn’t accomplish much, other than lowering your oven temperature every time you open the door. Basting is not the key to moist meat. (I’m getting to that), because basting is only skin deep. The constant opening and closing of the oven door can cause your oven temperature to lower– which means the turkey has to roast even longer. I baste now and then– but even as I am doing it, I know it is for my sake and not the turkey’s.
Basting really does matter, however, about a half hour before you take the turkey out of the oven. That’s when the pan juices help the skin crisp and turn a gorgeous mahogany brown.
What is the key to moist, juicy turkey?
Cooking the bird to the right temperature. When the thigh hits 170 degrees, take the turkey out of the oven and let it rest about 30 minutes. Resting is key: if you try to carve the bird too soon, the juices will flow onto your board, where they won’t do your mouth or stomach one bit of good.
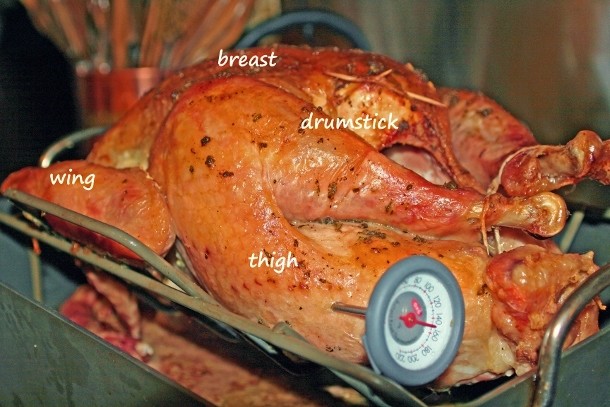
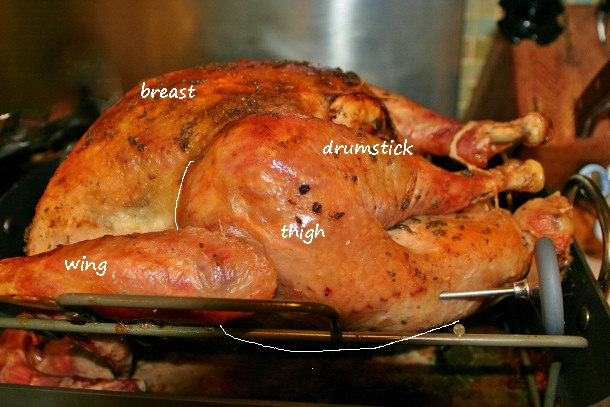
How do I put the thermometer in my turkey?
Here are a couple of views of where to insert the thermometer to take the turkey’s temperature.
Tomorrow I will post a photo-illustrated guide to How to Carve a Turkey. And here is my very simple, no-fail recipe for making a perfect moist, juicy, tender roast turkey. If you have any questions, just send them in on the comments below and I will get back to you very quickly.
Herb Roasted Turkey
Parsley, Sage, Rosemary and Thyme make an aromatic—not to mention lyrical— coating which infuses the turkey meat with flavor. Once in the oven, the turkey needs only occasionally basting to turn out perfectly.
2 cups chopped onion
2 cups chopped carrots
2 cups chopped celery
1 15-pound turkey
10 cloves garlic, peeled
1 cup loosely packed parsley leaves
1/4 cup fresh sage leaves
3 tablespoons fresh rosemary leaves
3 tablespoons fresh thyme
4 tablespoons butter
1 teaspoons salt
1/2 teaspoon black pepper
2 cups lower sodium chicken broth
- Preheat the oven to 350F. Coat the roasting pan rack with cooking spray.
- Remove and discard giblets and neck from turkey. Trim the excess fat. Rinse turkey with cold water; pat dry. Starting at the neck cavity, loosen the skin from breast and drumsticks by inserting fingers, gently pushing between skin and meat. Lift wing tips up and over back and tuck them under the turkey.
- Place garlic in the work bowl of a food processor and mince. Add the parsley, sage, rosemary, thyme, salt and pepper and pulse the machine until the herbs are finely minced. Add butter and pulse to combine. Rub this mixture under the loosened skin of the turkey, taking care to distribute it as thoroughly and evenly as possible over the entire surface of the bird. Rub any excess over the skin.
- Place the onion, carrots and celery in the bottom of the pan; add the chicken broth. Place the turkey breast-side facing up on the vegetables or on the rack set over the vegetables.
- Roast the bird, basting occasionally as needed. If the breast seems to darken too quickly, drape it with a piece of foil. Roast until a meat thermometer inserted into the thigh registers 170-175F, about 3 1/2 hours. (Check the internal temperature at about 3 hours as a precaution). Remove from oven and let stand 20-30 minutes before carving.
Serves 12 with leftovers
Of course you need gravy with that turkey– so reserve all the pan juices and check your mailbox later today for my simple, lump-proof Sherried Gravy recipe.
And now, the all important, step-by-step photographic illustration of How to Carve Your Turkey.
Now go fill your belly with vittles and your heart with the warmth of your gathering!
For more Thanksgiving recipes and a guide to planning, click here.


Herb roasted turkey looks awesome,gonna try it this year!
Going to give this recipe a try this year on a Heritage turkey I bought. Cooking it in my Big Green Egg. Mmmmmmmmm, I can smell it already…..
Great, Bill, let me know how it turns out! And by the way, as is our long time tradition, I will be serving home cured salmon (grav lax) to nibble on before Thanksgiving dinner…(It is my Mom’s recipe, different from the version we made for you at the Fungus Festival)
Have a wonderful holiday filled with joy and great food!
We will have CR sockeye Lox as well. I am going to use your recipe and cook the turkey in my Big Green Egg. I love the way this things cooks. After the wine is poured, we will toast our friends David and Marge, then feast. I will follow up with a full report after the tryptophan wears off 😉
Hi I will make my herb roasted turkey tomorrow, it looks awesome. thank you!!!!
Tomorrow– or on Thanksgiving? Either way, ENJOY!
I noticed that you did not include the chicken stock anywhere in the directions. Do you put it with the veggies in the bottom of the pan? Thanks!
This is my first Thanksgiving to cook everything by myself (I am a college student!), so I am going to go big or go home!
Tara– I am so sorry! But for a “starter” Thanksgiving cook, you are very astute: yes, you put the broth in the pan. I added it into the recipe where it belongs. Many thanks for your good catch!
I hope your Thanksgiving is filled with laughter and warmth– and lots of wonderful food.
-Marge
I did it! I did it! I did it! My herb roasted turkey couldn’t have turned out more perfectly! Ours was Christmas dinner and feeling the skepticism of mom and mom-in-law (who were certain turkey should be bagged, brined, or smoked) looking over my shoulder and a very supportive husband cheering me on, I prepared my very first turkey dinner ever. It naturally included Marge’s Whipped Sweet Potatoes with Pecan Streusel Topping and Green Beans with Glazed Onions.
I admit I’ll be turning 50 on my next birthday, but due to going to others’ homes for holiday meals over the years, I’d just never done the whole turkey dinner. Also, you should know I’m a beginning cook, but I knocked this one outa the park, thanks to you, Marge! And I can proudly say it was the best turkey I’d EVER tasted. It’ll feel easy next time; what a confidence booster!
You made MY day! I am so happy to hear your turkey (and meal) turned out so well…And that Mom and Mom-in-law can no longer intimidate you. You are absolutely right– it will be even easier next time. And by the way– you don’t have to wait a whole year. There are plenty of other times to roast a turkey. It’s great for Sunday supper with leftovers you can turn into new meals. And it’s really good for casual gatherings like Superbowl– you roast it ahead and serve sliced turkey with do-it-yourself sandwich fixings.
At any rate, I am really happy it turned out so well. Happy New Year!
The chicken broth; what is it for? Thanks.
The chicken broth, which you add in step #4, helps start the cooking with a little bit of steam and helps prevent the vegetables at the bottom from scorching before the turkey starts giving off juices. I hope you have a great Thanksgiving!
Hi Marge
This may seem like a silly question. It what do you do with all that great carrot, celery, onion, chicken stick once the turkey is done? I’m assuming you make gravy with it, but do you take the veggies out of the drippings before you make it? Do you use the veggies in any other way after this or not?
Hi Darcy– It is not at all a silly question! I strain the liquid. Taste the veggies and if their flavor is great, you can serve them on the platter or on the side, and if not, simply discard them. The liquid is like gold: it is the key to making great gravy. Here is my gravy recipe:https://asweetandsavorylife.com/how-to-make-sherried-turkey-gravy-lump-free-guaranteed/
Happy Cooking!