The other day, a student in one of my ICE (Institute of Culinary Education) classes asked me how long it takes to cook a soft-boiled egg. Actually, she may have said it correctly and asked for how long she should soft-cook an egg.
It is an important distinction. You don’t want to actually boil an egg– regardless of whether you want it soft, medium or hard. Unless, that is, you are having a Dr. Seuss party and want to make green eggs. Boiling eggs or cooking them for too long turns the surface of the yolk green, thanks to a reaction between the sulfur in the white and the iron in the yolk.
The method for cooking eggs soft, medium or hard is the same; only the time changes. But before I describe the method, I want to tell you about the draw-backs to a couple of common methods.
Egg Cooking Don’ts
* Don’t bring water to a boil before adding eggs: placing an egg in boiling water changes the temperature of the egg too quickly and can result in cracked, leaking shells.
* Don’t boil eggs: As discussed above, this can lead to green-rimmed yolks. Vigorous boiling can also cause the shells to crack and the eggs to leak.
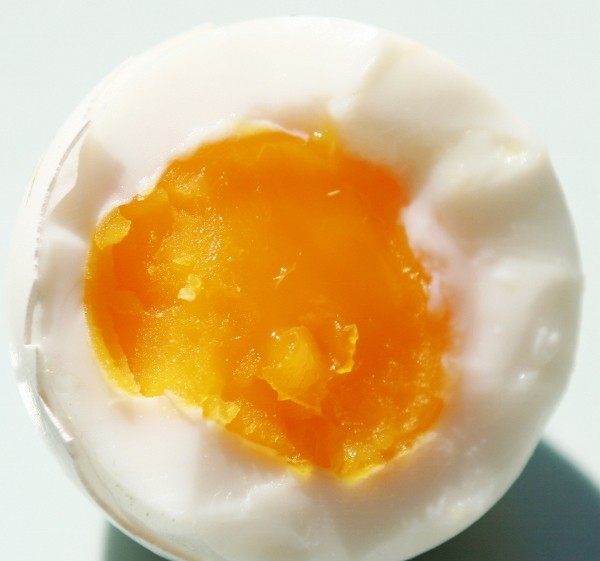
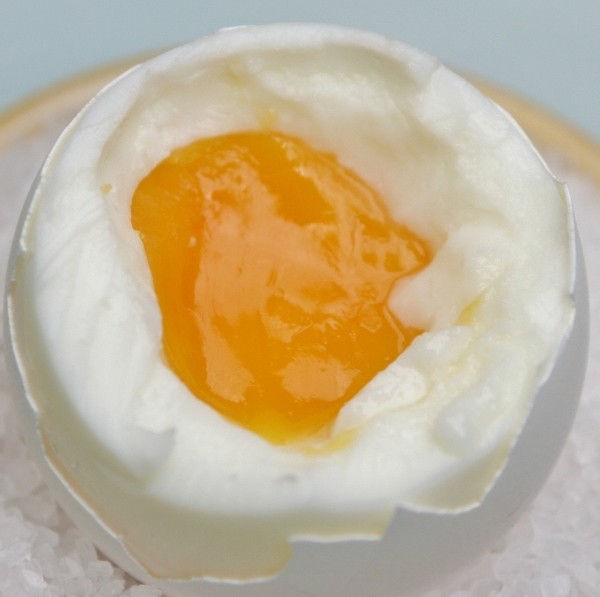
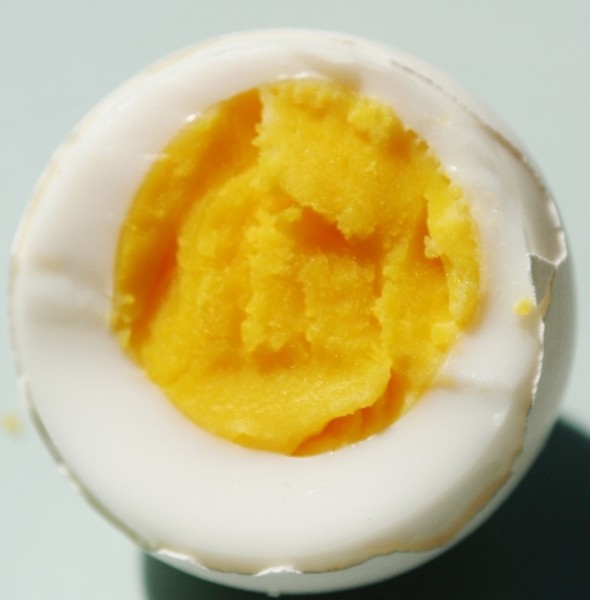
To choose how long you want your egg cooked, see the pictures below the recipe.
How to Hard-boil and Soft-boil Eggs
large egg(s)
water
1. Place eggs in a saucepan large enough to just hold the eggs in a single layer. Add enough cold water to cover the eggs.
2. Bring the water to a boil. As soon as bubbles appear around the perimeter of the water and cause the eggs to gently rock, turn off the water, cover the pan and start the timer.
3. Allow soft-boiled eggs to stand in the covered pot 3 minutes; hard boiled eggs 12-15 minutes.
4. Run eggs briefly under cold water until just cool enough to handle to serve warm, or place in a bowl of cold water to stop the cooking (if you want to serve them at room temperature or refrigerate).
Nutritional analysis per serving: 71 calories, 6 g protein, 5 g fat, 2 g saturated fat, 71 mg sodium
“Cooking time” below refers to the amount of time the egg sits in the covered pot.
Soft-boiled Egg
Cooked 3 minutes
Yolk is a thick liquid; white is mostly solid with some soft areas near the center
Medium-boiled egg
Cooked 12 minutes
This is my “hard-boiled egg” of choice. The white is firm; the yolk is firm but not dry. Note the slightly darker areas of the yolk: it is not wet, but it is not completely dry, either.
Hard-boiled egg
Cooked 15 minutes
No moisture in the yolk; slightly dusty quality. White is firm throughout, again with no sign of moisture– but not rubbery.


Great one! More people can’t get this right at all. Thanks for sharing
So helpful. And great visual aids!
VERY INTERESTING AND USEFUL INFORMATION. I NEVER KNEW THAT THE GREEN RIM CAME FROM BOILING THE EGGS. I’LL LOOK FORWARD TO YELLOW YOKES IN MY FUTURE!
The photos are an excellent aid, Marge. Just wish you had included one that showed an overcooked egg as well.
You are so right– that would have helped! Thanks for the suggestion, Robin.
ONE MORE THING TO ADD TO GETTING A PERFECT EGG…AFTER EGGS HAVE COOKED THEIR TIME, EMPTY HOT WATER AND THEN SHAKE THE EGGS AGAINST THE SIDES OF THE PAN TO MAKE THE EGGS CRACK THEN PUT THEM IN TO A DISH FULL OF ICE CUBES, LET SET TEN MINUTES AT LEAST, MIX THEM AROUND IN THE ICE BEFORE PEELING, THEY PEEL SO EASY….AND THEY ARE SO COLD YOU CAN USE THEM RIGHT AWAY .
Just to say that one can avoid the shells cracking by puncturing it with a pin designed for just the purpose. This then allows for the egg(s) to be placed directly into boiling water. 6 minutes to soft boil then immediately shock with cold water, which they do all the time in Germany. I’ve never encountered any green discoloration this way.
How interesting, Seth. You cook it in already boiled water for six minutes, i let it warm up as the water comes to a boil and then allow it to sit another 3 minutes and we end up in the same place. The pin hole is probably important in your method to keep the shell from cracking, and I assume that somehow no egg leaks out when you put it in the boiling water.
In all likelihood, both take about the same amount of time for the cook, I would guess. Thanks for sharing this method!
I have used this method, however, I forget if you remove the pot from the heat of an electric stove before the 12-15 minute “cook” in covered pot?
Also, what temp do you start the water at?
Thanks,
Liz
Hi Liz– You bring the water and eggs to a boil together, which means you likely have your pot set over high heat. Once the water comes to a boil, remove the pan from the burner, cover the pot and let it sit, off the heat and covered. It doesn’t matter whether you are cooking over gas or electric heat (or even an open fire if you are camping!). The method is always the same.
Enjoy your eggs!
I was so thrilled to find this site…my sister just gave me a recipe, same method but at 20 min., hers do come out like your 12 min. egg..Nice moist yolk…I do NOT like dry yolks so I thought I would try your 12 min. method…no clue what is going on but I ended up with Dry yolk???? Is it suppose to be a gentle boil or rolling? I did in between..just starting to roll?? any clue?
* per last post I did NOT remove from heat…should I have??
You want to remove the pot from the heat, cover it and set your timer. You are timing how long you leave the eggs in the covered pot off the heat. Enjoy!
Marge,
Recently I read somewhere that putting your eggs in water that’s already boiling (as opposed to starting the eggs in cold water, as I’ve always done and been taught), helps make them peel easier. I tried it, and that’s my go-to method now. I never have peeling trouble now. The only drawback seems to be that they can easily crack. You can either lower them in with a spoon, or poke a hole in them first with an egg pick (which I got in Sweden from my in-laws). 10 to 11 minutes simmering, then immediately cover in cold water until they cool. The tip came from a chicken farmer. Give it a try!
Rebecca– It is so interesting you brought this up. That is the way I used to always make my eggs, until I learned this method, which worked better and more reliably for me. (Especially because it drove me nuts when the eggs would crack during cooking). About a month ago, I saw that the idea of adding eggs to boiling water was re-gaining popularity, and a few people have brought it up to me since. So interesting, the way these things cycle.
One thing I want to tell you, which — all cooking method preferences aside– I truly believe in, and that is touted by farmers and the Egg Board alike…the ease of peeling has more to do with how fresh an egg is. Eggs that are too fresh more fully fill their shell, while eggs that have been around a little while shrink slightly away from their shell, which makes them easier to peel. Makes sense, doesn’t it?
Anyway you boil them, enjoy your eggs!
Absolutely….I love eggs! And it’s interesting to see how things cycle back and forth with food. It makes your head spin…
Love your blog!
I recently read that adding a tablespoon of salt to the water makes the egg shells peel off easily. I have only tried it once, but it worked like a charm. Has anyone else tried this?
Interesting. That isn’t one I have heard, but i will give it a try– with fresh eggs, so it really is a good test.
Thanks for sharing such an interesting and helpful post. I always put some salt to avoid cracking of shells. I will follow your instructions with some fresh eggs.